In the day-to-day life of a homeowner, there are numerous maintenance tasks that come up, and toilet bowl repairs are amongst the most common.
In this discussion, we will delve into some essential points about repairing your toilet bowl.
Below is a useful summary of key areas in toilet bowl maintenance and repair:
- Clogged Toilet: Understanding how to address such problems can save you a lot of stress and maintain hygiene.
- Leaky Base Repairs: Spotting and fixing leaks promptly can prevent serious water damage.
- Poor Flapper: A running toilet due to a faulty flapper requires quick rectification.
- Loose Flush Handle: Tips on how to tighten a loose flush handle for easy use.
- Faulty Flush Valve: Replacing a leaky valve can drastically improve your toilet’s efficiency.
- DIY Toilet Troubleshooting: A brief guide to understanding toilet parts and their respective repairs.
Understanding these basic repairs can increase the longevity of your toilet bowl, ensuring your home retains its comfort and functionality.
Tending to Your Toilet Bowl Repairs
Maintaining our toilets is an essential part of homeownership. Regular checkups can prevent more serious issues down the line.
Clogged toilets, for instance, if not addressed can become a serious issue affecting the entire sewage system.
While we’re experts at tackling these problems, developing basic DIY skills can save you time and money on smaller repairs.
In most cases, you will find that these prevalent issues are simple fixes with the right guidance.
Contents
- Common Toilet Problems and Repairs
- Steps to Fix a Clogged Toilet
- Diagnosing and Repairing Leaks at the Base
- Repairing a Running Toilet Due to a Poor Flapper
- Tips to Fix a Loose Flush Handle
- Leaky Toilets: Replacing a Faulty Flush Valve
- Understanding Parts of a Toilet and Their Repairs
- Replacing a Broken or Corroded Flush Handle
- How to Improve Your DIY Toilet Repair Skills
- Replacing the Old Flapper Valve
- Installing and Adjusting a New Fill Valve
- Aussie Toilet Wisdom
Common Toilet Problems and Repairs
The toilet not being caulked to the floor can lead to unpleasant odours from residue or potty training remnants. It’s easy to fix by applying caulk around the base.
If you have a loose toilet seat, it may need stabilizers. Remove the seat, insert rubber bushings, secure the stabilizers with screws and reattach the seat. This prevents wobbling.
- Rust can cause issues with your toilet. Rusty hinges and bolts can be problematic; however, clear nail polish or drilling out rusted bolts can rectify the issue.
- Running toilets are usually caused by a faulty flapper. If water is seeping into the bowl, consider replacing this part.
- Rocking toilets need stability. A simple solution is to insert plastic shims under the base, then re-caulk and tighten the bolts.
A ‘bang’ every time you close the lid can be minimised with a vinyl bumper on the tank lid. You might also want to invest in a slow-close seat.
If you have a cracked toilet seat, replacing it is often an easy task. Pick up a new seat from your local hardware shop and simply tighten it into place.
- ‘Sweaty’ toilets often occur in humid climates. Insulated tanks are available to alleviate this issue.
- Bubbling toilets could indicate a clogged or improperly vented system. Seek professional help for this issue.
- A toilet that won’t flush well might have an obstruction in the vent pipe or drain line. If you can’t see a blockage, your toilet could be defective.
Sluggish toilets may have clogged rinse holes under the rim. You can easily unclog these with a coat hanger and mirror.
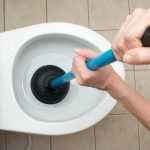
If your issue is a clogged toilet, a plunger with an extension flange should clear the way. It’s handy to keep one of these tools in your home.
Steps to Fix a Clogged Toilet
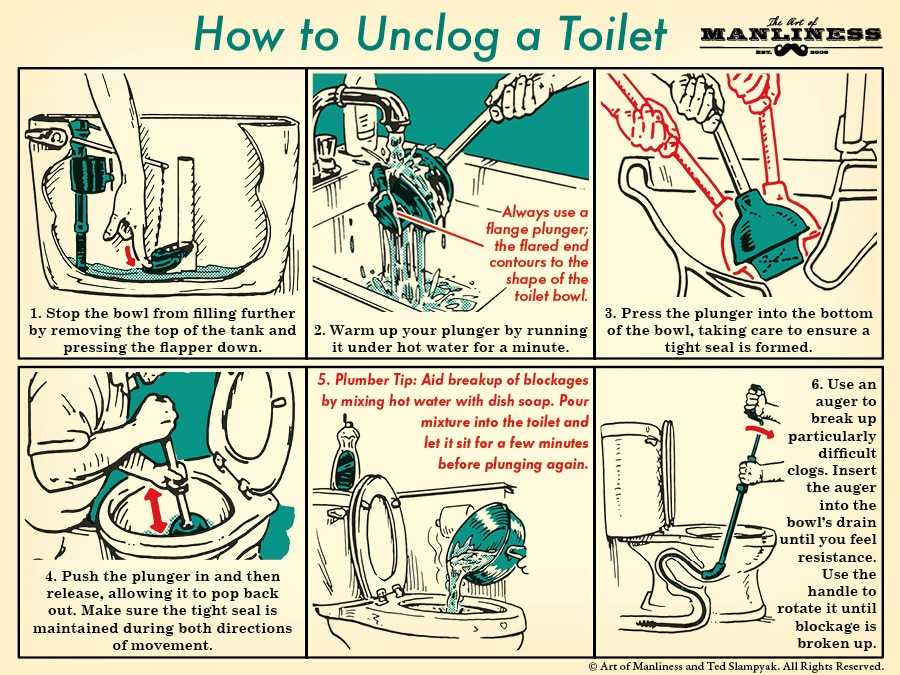
Dealing with a clogged toilet can be frustrating, but don’t fret. Here’s how you can effectively address this issue.
Initially, pour a substantial amount of dish soap into the toilet bowl. Roughly one to one-and-a-half cups should suffice.
Allow this soap to sit undisturbed for at least 45 minutes. Ideally, letting it sit for 90 minutes would be best.
- During this time: The soap will progressively break down any grease or feces causing the blockage.
- If the clog persists: Heat up a pot of water (avoid boiling it) and slowly pour it into the toilet in a circular motion.
- Let the hot water sit: Leave the hot water for about 30 minutes before flushing to aid in declogging.
- If overflowing occurs: Use a bowl to scoop out excess water to prevent an overflow disaster.
If after all these, the clog hasn’t cleared, you may need to repeat the process or consider using a plunger if available.
This simple yet effective method should help in clearing out most toilet clogs without requiring professional plumbing assistance.
Please note: While these steps are generally effective, they might not work for more severe blockages. In such cases, consider seeking help from a professional plumber
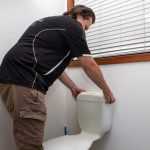
Diagnosing and Repairing Leaks at the Base
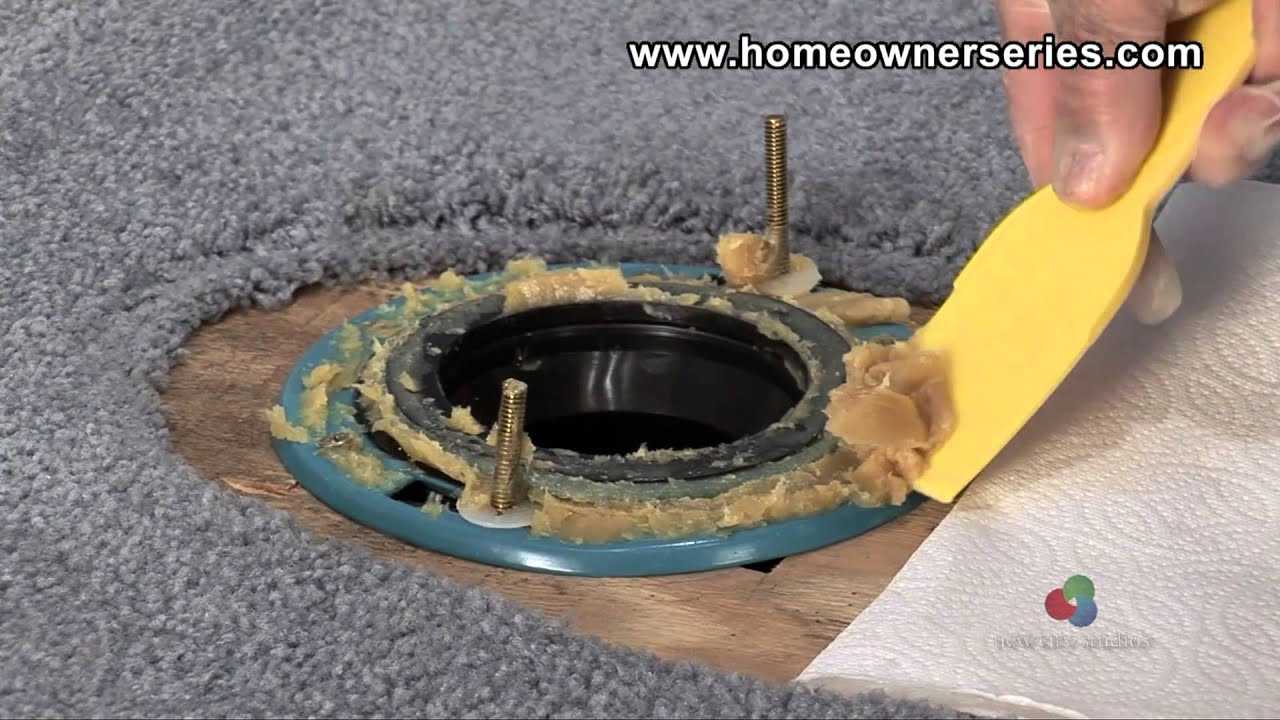
Should your toilet bowl develop a leak at its base, the likely culprit is a failed seal below. This issue requires careful attention to avoid escalating into a full-blown plumbing catastrophe.
The most common indicator of seal failure is water pooling around the base of the toilet. Alternatively, your leak might be due to a loose supply tube, faulty shutoff valve, or even a sweaty bowl.
Connect new water-supply tube to fill-valve shank. This is situated on the bottom of the toilet tank.
| Step | Action | Note |
|---|---|---|
| 1 | Disconnect the supply tube | Use a wrench and ensure the valve is closed and toilet drained. |
| 2 | Pry off closet bolt caps | Use a wrench to remove hex nuts afterwards. |
| 3 | Lift the toilet carefully by the bowl | Set it down on an old blanket or cardboard sheet. |
| 4 | Scrape off old wax gasket from closet flange | Note if part of flange is broken and requires repair strap. |
| Ensure to check for leaks after completing the repair | ||
In some cases, you might be able to fix a leak by simply tightening the closet bolts holding the toilet to the floor. However, do so with caution to avoid cracking the toilet’s base.
If your attempts at tightening prove fruitless, it’s time to replace the wax gasket. Keep in mind that any water seeping from beneath your toilet signals a need for immediate action.
Lastly, it’s worth mentioning a long-standing debate about caulking around the base of toilets. Some argue it can conceal leaks and encourage bacteria growth while others believe it protects against potential water damage.
Repairing a Running Toilet Due to a Poor Flapper
What Causes a Running Toilet?
A running toilet often occurs due to a faulty flapper. The flapper is the toilet’s device that controls the water flow from the tank into the bowl.
How Do I Identify a Poor Flapper?
You can identify a poor flapper by its inability to seal the overflow pipe properly. It causes constant hissing or trickling resulting in incessant water flow.
What Happens if I Don’t Fix it?
If you don’t fix a poor flapper, it may lead to severe water wastage. This could result in an unnecessary hike in your water bills.
Can I Fix it Myself?
With some basic knowledge and tools, you can indeed tackle this issue yourself. However, if it feels too complex, seeking professional help is never a bad idea.
What Steps Can I Follow to Fix It?
Start by turning off the water supply leading to your toilet and flushing away any remaining water in the tank.
You then need to disconnect the lift chain and remove the old flapper.
Proceed by installing your new flapper and reconnecting the lift chain, ensuring it has enough slack to allow the flapper to seal completely.
Finally, turn back on your water supply and let your tank fill. Test your new installation by flushing a couple of times checking for any leaks or running issues.
Is There Any Preventative Maintenance?
A regular inspection of your toilet’s internal components can prevent many problems. Timely replacement of parts like flappers mitigates excessive water usage.
What if the Problem Persists?
If the problem continues, it might be time to call in a professional. Experts like those at Fergusons Plumbing can provide efficient, long-term solutions.
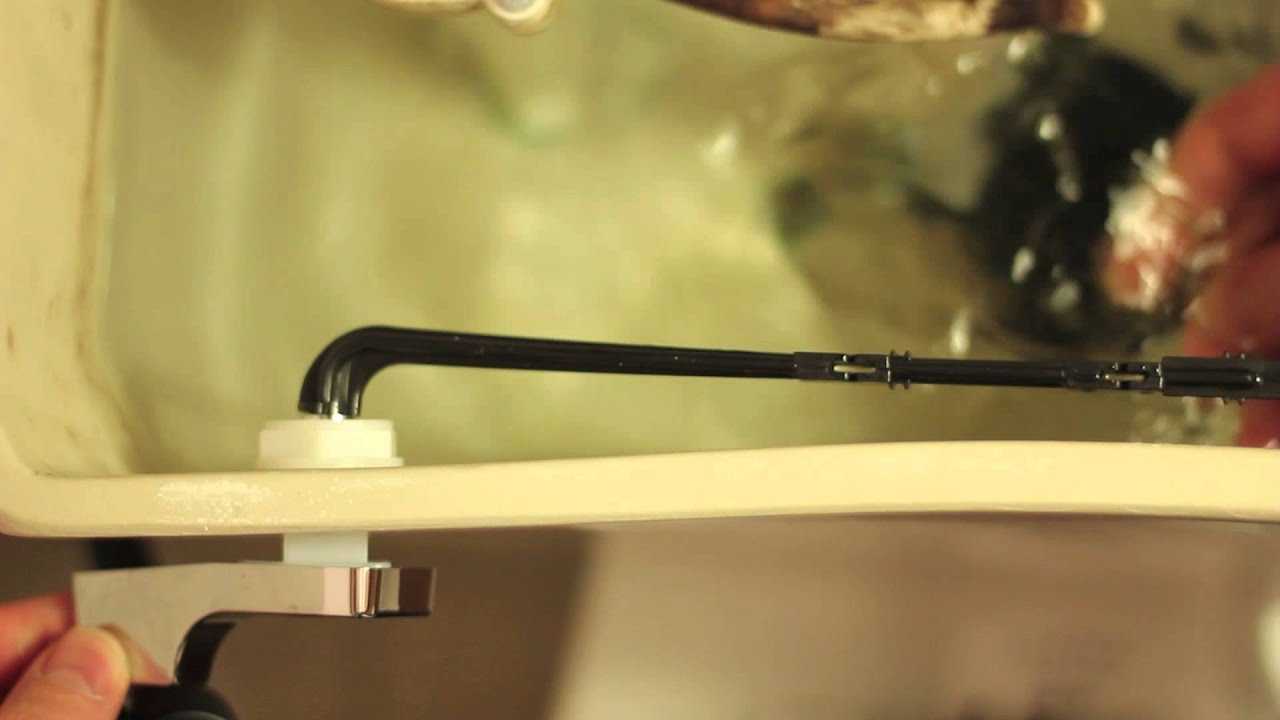
Tips to Fix a Loose Flush Handle
When encountering a loose flush handle on your toilet, first consider if it’s due to the mounting nut. It’s crucial not to turn this nut counterclockwise as it may strip the threading, making it harder to remove.
If dealing with a damaged nut, try carefully filing two sides of it smooth. This should allow you to use your pliers to establish a stronger grip for removal.
Removing Old Components
Take note of any black rubber O-ring attached to the mounting nut which aids in preventing leaks from the handle. If separate from the nut, ensure you also remove this component.
In some cases, you might be able to unscrew the lever from the handle for easier removal. Look out for any screws on the lever assembly and utilise a screwdriver to undo them.
Installing New Parts
Your new toilet handle should come with an included lever. Begin by lifting your toilet lid and unclipping the chain from the lever linked to your handle.
Loosen the mounting nut on the handle by hand or with pliers by turning it clockwise. Following this, extract both the handle and lever from the tank.
Ensure that your new handle corresponds well with your current bathroom fixtures before installation. Slide your new handle and lever into place within your toilet tank.
Tighten down the mounting nut inside the tank by rotating it counter-clockwise and then reconnect the chain to a hole at the end of the lever.
Additional Tips
If you’re experiencing problems getting your new handle to function correctly, don’t hesitate to reach out to a professional plumber for assistance.
If you find your toilet continuously running even though everything seems fine, consider replacing the flange or adjusting the water level so it is below the overflow pipe.
If your toilet doesn’t have a chain, look for a small plastic box on the vertical flapper valve. Rotate the assembly away from the lever and slide it out.
A hacksaw can be useful if you need to trim a too-long lever that is preventing complete flushing by bumping into the tank lid.
To conclude, replacing a toilet handle requires a bit of patience and the right tools. But with these tips, you should have your toilet back in working order in no time.
Leaky Toilets: Replacing a Faulty Flush Valve
Identifying a Leaky Flush Valve
A running toilet often signifies an improperly sealing flush valve. The presence of water around your toilet base, especially post-flush, can also hint towards a faulty valve.
Tools Required for Replacement
Replacing a leaky flush valve necessitates certain tools. An adjustable wrench, channel-type pliers, a water shut-off wrench, and a flush valve replacement are essential.
Handling Flush Valve Replacement
Begin the procedure by shutting off the water supply using the shut-off wrench. The adjustable wrench should then be used to loosen the nut linking the water supply line to your toilet.
Now eliminate any blockages from the overflow tube using the channel-type pliers and discard the old flush valve with the aid of your adjustable wrench.
Position the new flush valve securely into place. Reconnect the water supply line, making sure to tighten the nut properly.
To resume your water supply, rotate the shut-off valve anti-clockwise. Test your newly installed flush valve by flushing your toilet and ensuring there are no leaks.
Troubleshooting Tips
If you encounter issues post-installation, inspect if the flapper is correctly aligned or if chain length adjustments are required for smoother function.
Frequently Asked Questions
You might wonder how regularly your flush valve needs replacing. The answer lies in detecting symptoms of leaking rather than adhering to a set interval.
Flush valve repairs can certainly be completed independently if you’re comfortable with basic DIY tasks. Expect to spend roughly an hour on this process barring any additional complications.
Additional Advice
Regular toilet inspections for leaks can dodge further damage. Also, maintain a functional overflow tube and keep an eye on the fill valve conditions for possible wear or malfunctions.
Understanding Parts of a Toilet and Their Repairs
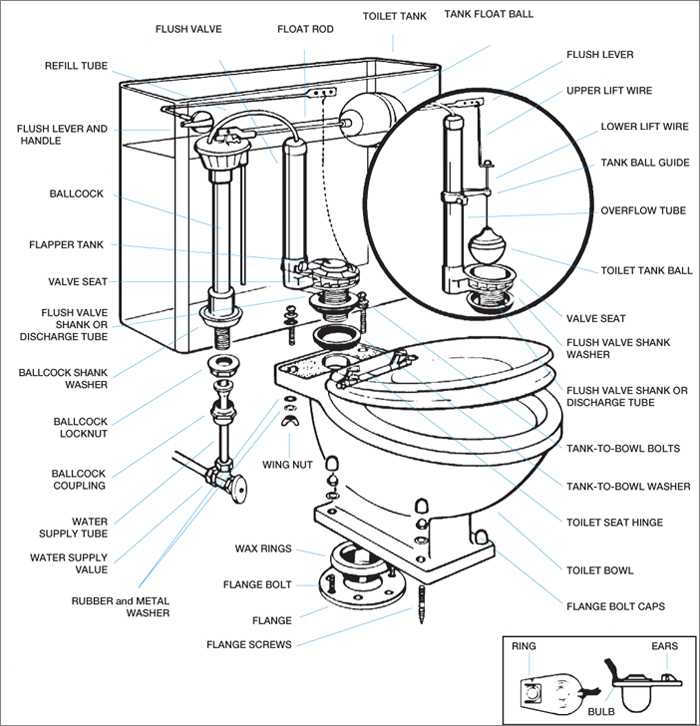
Toilet repairs necessitate understanding of key components like the toilet flapper. The flapper’s size, measured in width, ensures correct flushing once replaced.
Repair costs for toilets may vary. Undertaking a DIY repair typically cost between $50 and $200. Professional repairs, on the other hand, range from approximately $130 to $300.
Plumber hourly rates also fluctuate based on the complexity of the job and location. Changing parts such as the toilet float and fill valve often rectifies water level problems.
Installation of a new flapper and chain can alleviate slow leaks. Alternatively, replacing the toilet seat is another common repair, which typically will cost you between $60 and $190.
Understanding the costs of toilet parts is also crucial. Wax rings can range from as little as $1.80 to $25. Tanks are generally priced between $34 to $260.
Smaller items like a 90-Degree PVC pipe could be around $2.90, while a new flapper might cost you between $12 to $30. Fill valves, shut-off valves and flush valves generally range from between $12 to $60.
More complex repairs can include a rebuild of the closet tank or replacing the entire toilet bowl. Such tasks can set you back anywhere from $220 to $430.
Pipe replacement is another complex task that typically ranges from $80 to $440 per hour or might be quoted at a fixed price by some plumbers.
Toilet wax ring and seal issues including removal, replacement, and reseating of the toilet are generally resolved for about $230. Issues with flush valves can usually be fixed for between $70 to $150.
Understanding these key points can help in identifying and addressing various toilet issues efficiently and save you time and money in the long run.
Replacing a Broken or Corroded Flush Handle
A broken toilet flush handle can be problematic, but thankfully it’s not difficult to replace. Here is my detailed guide to help you do the job quickly and efficiently:
- Identify the Handle’s Mounting Position: It’s important to understand where your current handle is placed. There are various types available that cater to different mounting positions.
- Detach the Lift Chain: Be careful when detaching the lift chain from the lift arm to the flapper valve. Take note of where the clasp was fastened in case it needs replacing.
- Remove the Old Handle: The mounting nut should be loosened by turning it clockwise. You can then slide out the old handle through its hole. Most toilets have reverse threaded nuts.
- Install the New Handle: Next, remove the nut and place the new handle into position. Hand tighten the nut counterclockwise once you’ve slid the rubber washer onto the stem.
- Reattach the Chain: Finally, reconnect the flapper chain using the correct hole in your new handle. Test it by flushing and adjust if necessary.
Familiarise yourself with these steps well before you start working on replacing your flush handle. Having all tools within easy reach will also help streamline your work.
You don’t need professional assistance for this task unless you’re experiencing complications or uncertainties during your repair process. If so, don’t hesitate to contact a professional plumber.
To further simplify this process, consider watching some relevant YouTube tutorials. These can potentially provide step-by-step visual guidance about replacing a broken toilet handle or lever.
How to Improve Your DIY Toilet Repair Skills
Whether you’re a seasoned handyperson or just getting your feet wet, the art of DIY toilet repair is something that can save you heaps of cash.
A Basic Understanding
Foremost, a basic understanding of your toilet’s working is crucial. It plays a cardinal role in determining the root cause of any problem.
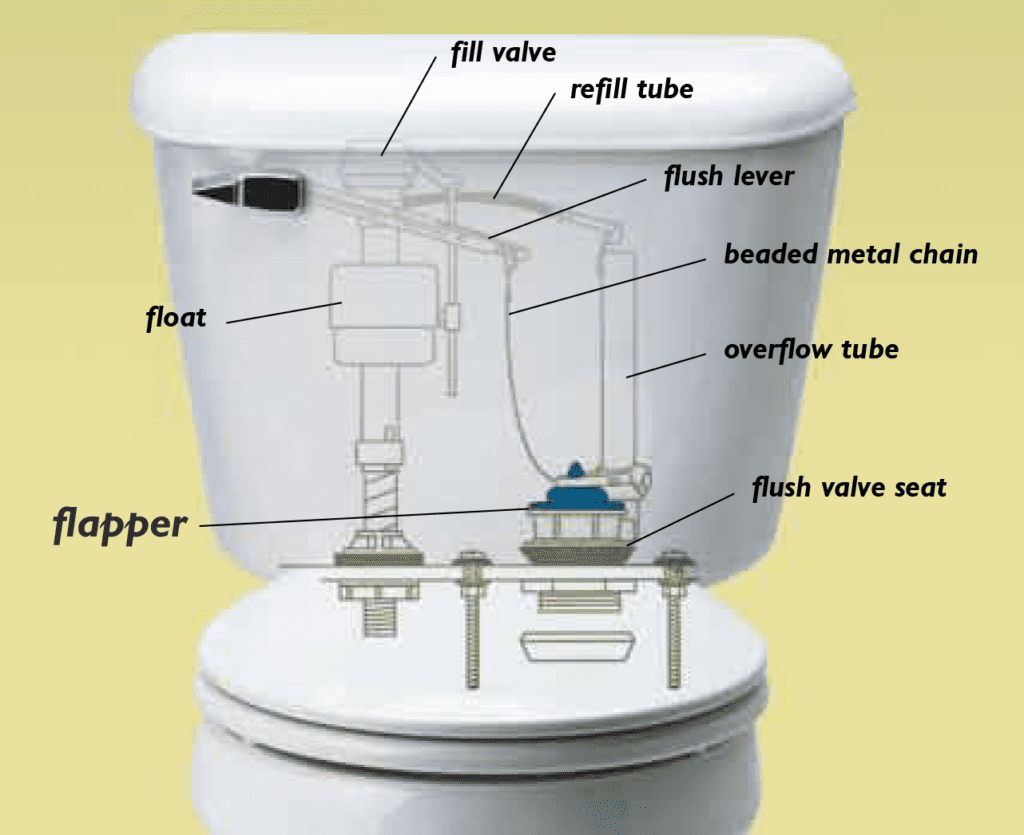
Familiarise yourself with parts like the fill valve, flapper, and overflow tube. Knowing what they do is key in diagnosing and fixing any issue.
Get the Right Tools
Another pivotal factor is tool selection. A good set of tools can make your repair job substantially easier and more efficient.
Essential tools include wrenches, pliers, and a plunger. A toilet auger or snake might also come in handy for more stubborn blockages.
Troubleshooting Common Issues
Learning about common toilet issues like leaks, running water or poor flushing helps predict problems before they cause major damage.
For example, if your cistern keeps running after a flush, it could be due to a faulty flapper or fill valve that needs replacing.
A periodic inspection routine can help identify issues early. When noticed, don’t delay the fix and risk exacerbating the problem.
An abundance of online resources such as video tutorials or forums like r/DIY on Reddit can assist in refining your toilet repair skills over time.
Remember to always prioritize safety during repairs. Turn off water supply beforehand and be sure to use appropriate protective gear.
Lastly, don’t be disheartened by occasional mishaps. Even professionals make mistakes, it’s an integral part of the learning process.
With perseverance, patience and the right approach, anyone can master DIY toilet repair skills and save a few bob in the process.
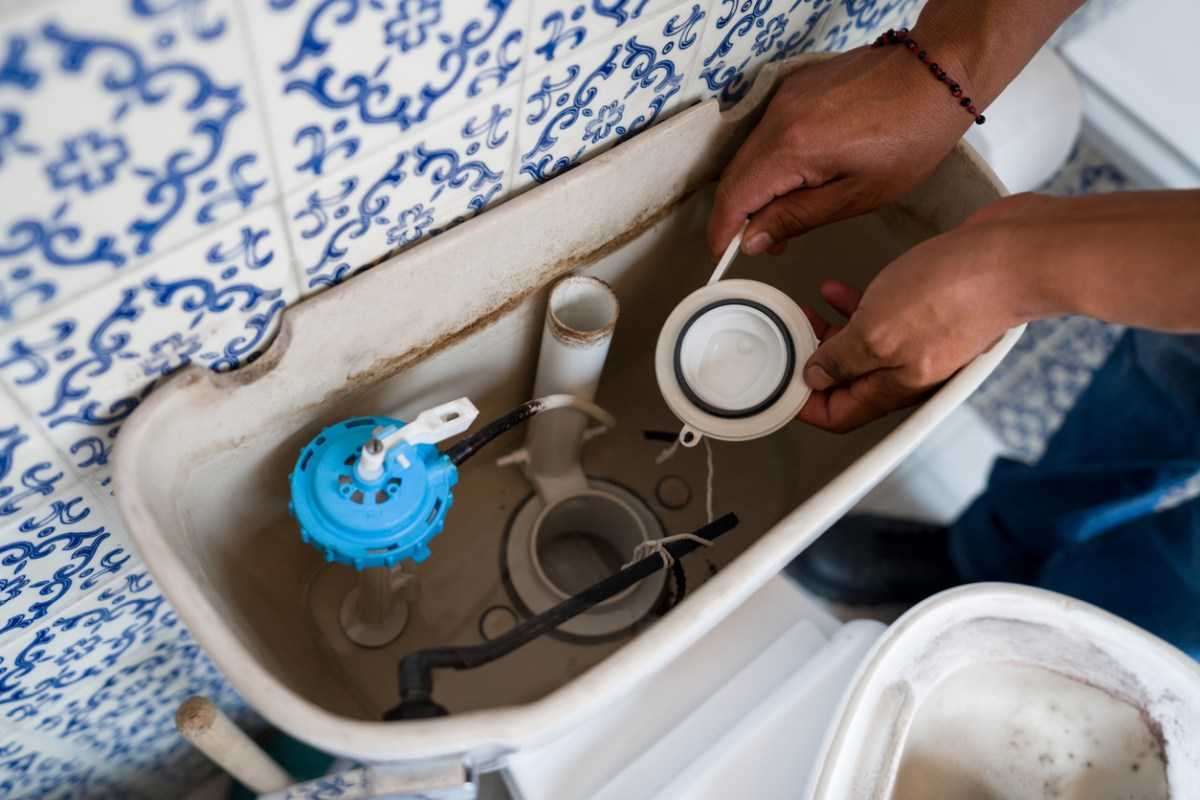
Replacing the Old Flapper Valve
If you’ve noticed a running toilet tank or rippling water in the bowl, you might have a leaking flapper valve. This common problem causes water waste and annoying “ghost flushing”.
The flapper valve is the rubber seal that lets water into the bowl when you flush. Due to hard water, over time, it may fail to form a tight seal.
- Start by shutting off the water supply valve behind your toilet. Turn it anti-clockwise.
- Next, remove the lid from the tank and flush your toilet to get rid of as much water as possible.
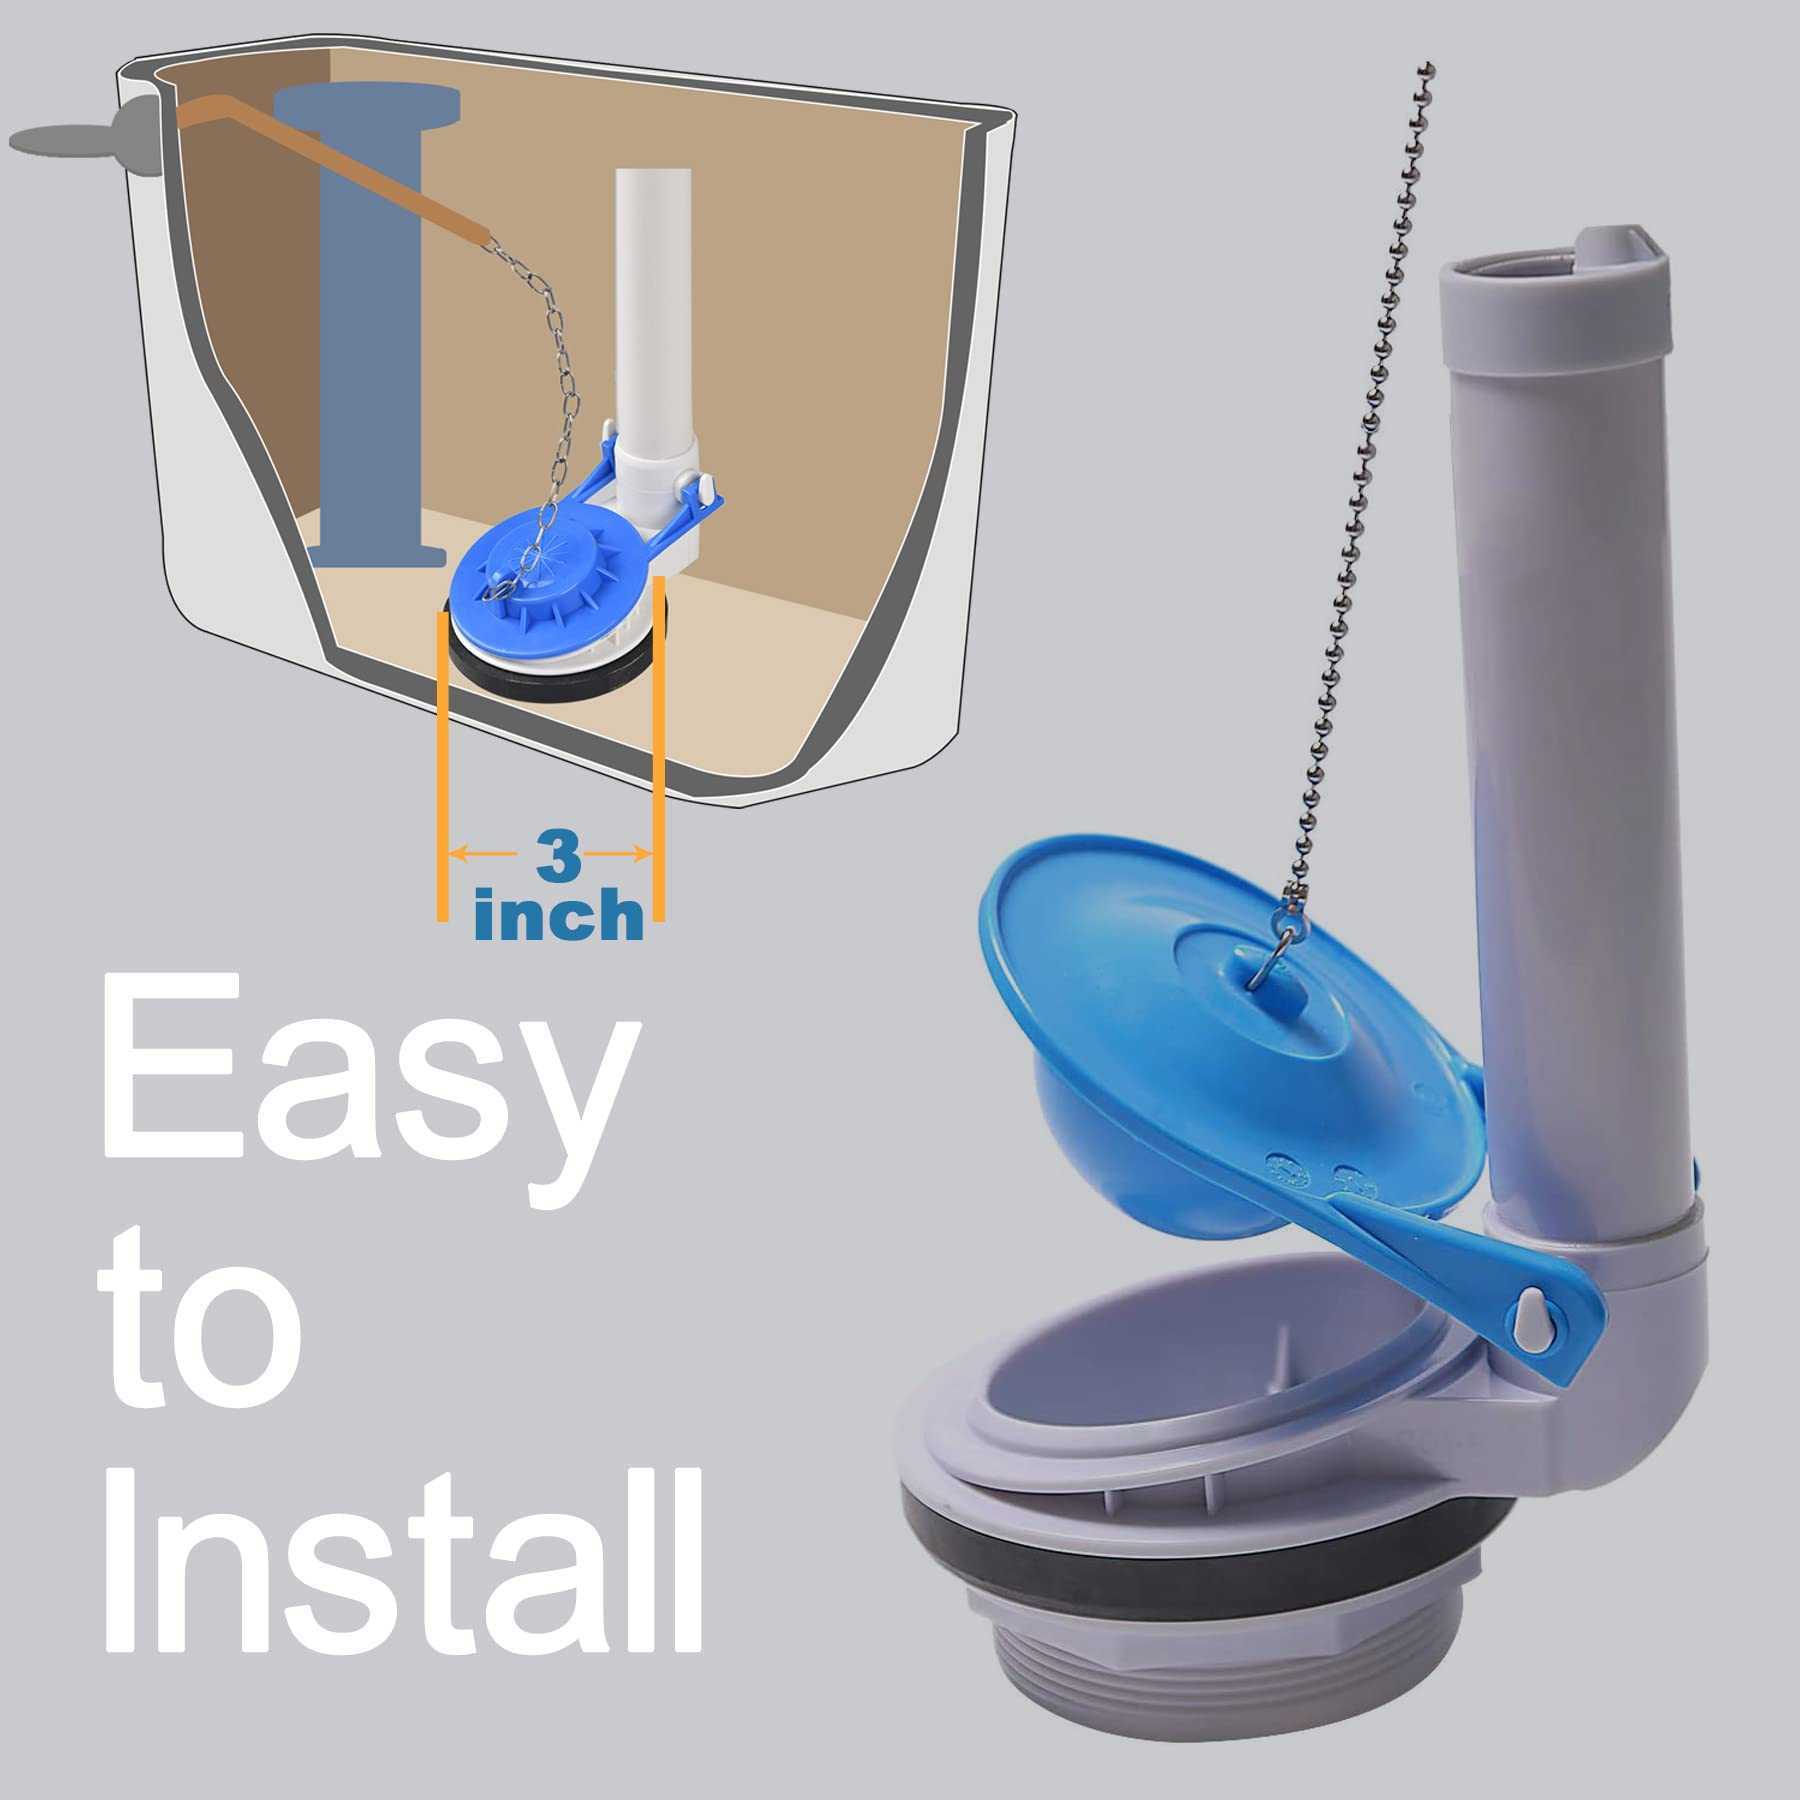
- Disconnect the lift chain from the flush lever and pull away the flapper from its positioning on the overflow tube.
Clean off any debris from the valve seat to secure a good seal. The new flapper valve should be aligned with the pegs on the overflow tube, positioned right over the drain.
- Then, clip the chain back onto the flush lever, leaving some slack in this chain.
- Push down on the flush lever to test for range of motion. Adjust if necessary for optimal performance.
Turn your water supply back on and allow your toilet tank to refill. If done correctly, your new flapper should prevent any water from escaping.
- If everything looks fine, replace your tank lid and discard of your old flapper. However, if leaking persists, you might need to check up on your flush valve or other tank parts.
Should you face any difficulties, remember that professional plumbers are just a phone call or click away. Don’t hesitate to get help when needed.
Installing and Adjusting a New Fill Valve
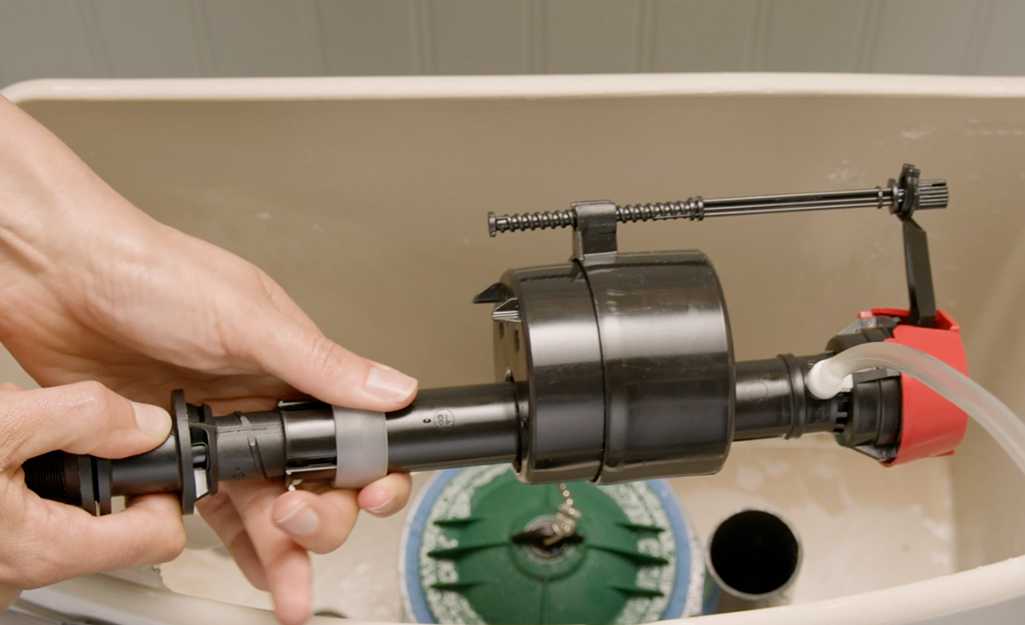
A common problem that indicates a fill valve replacement need is constant water flow. If you also encounter clogs, it’s time for a new valve.
Determine your fill valve type to get an appropriate replacement. Remember, not all valves are created equal.
The first step involves shutting off the water supply to prevent damage. This valve can’t miss; it’s usually located behind the toilet.
Next, drain your toilet tank. After flushing, use a wet/dry vacuum or sponge to remove residual water.
Important: Ensure your toilet tank is completely drained before proceeding further.
Afterward, unscrew the mounting nut holding the old valve. Use pliers or an adjustable wrench for this task.
Prepare the new valve by adjusting its height. The marking on top should sit 1 inch above the overflow tube.
Now, install the new valve in your toilet tank and secure it with the mounting nut. Tighten it adequately but avoid force.
Reconnect the refill tube trimmed to reach the overflow tube without bends or kinks. Ensure it is securely attached.
Finally, turn back on the water supply and inspect for any leaks. If everything is fine, you’ve successfully installed your new fill valve!
Aussie Toilet Wisdom
Keeping the dunny in top shape is a must for every Aussie homeowner. Bowl repairs and replacements can be straightforward when handled by a professional plumber. Don’t let minor issues snowball into larger ones, get your toilet fixed promptly. Remember, a sparkling toilet not only looks good, but also ensures a hygienic home.

- Drip-Free Tap Repairs with Fergusons Plumbing Group - March 4, 2025
- Keep Your Home Safe with Our Specialist Gas Leak Detection Services - March 4, 2025
- Upgrade Your Taps with Our Stylish and Functional Tap Replacement Service - February 4, 2025
Related posts:
 Flawless Flushing. Expert Toilet Cistern Repairs
 Blockage Busters: Ferguson Plumbing’s Fast Toilet Unblocking Services
 Sydney Toilet Troubles? Get a Rapid Fix with Our Emergency Repairs
 Efficient and Safe. Gas Regulator Replacements
 Save Water, Save Money: Dripping Tap Repairs by Fergusons Plumbing
 Keep the Heat On with Our Fast Hot Water System Repairs/Replacement Service